1. U盘引导后,磁盘空间推荐设置说明
名称
数值
说明
hdsize
最大
定义目标硬盘的容量大小
swapsize
1
定义目标硬盘的容量大小
maxroot
空着
定义目标硬盘的容量大小
minfree
0
剩余的可用空间的容量大小
2. 去掉local-LVM卷 进入PVE管理界面 【shell】用命令
1 lvextend -l +100 %FREE -r pve/root
3. 更换更新源: 3.1处理掉企业源 & 更换ceph更新源 1 echo "deb https://mirrors.tuna.tsinghua.edu.cn/proxmox/debian/pve bookworm pve-no-subscription" > /etc/apt/sources.list .d/pve-enterprise.list && echo "deb https://mirrors.ustc.edu.cn/proxmox/debian/ceph-quincy/ bookworm no-subscription" > /etc/apt/sources.list .d/ceph.list
3.2更换清华
1
2
3
4
5
6
7
8
9
cat > /etc/apt/sources.list <<EOF # 清华源 deb https: deb https: deb https: deb https: # Debian官方安全源 # deb https: EOF
1 sed -i 's|http://download.proxmox.com|https://mirrors.tuna.tsinghua.edu.cn/proxmox|g' /usr/ share/perl5/ PVE/APLInfo.pm && systemctl restart pvedaemon.service
4. 开启PVE硬件直通
1 GRUB_CMDLINE_LINUX_DEFAULT ="quiet intel_iommu=on"
编辑完文件后按“Ctrl + X” > “Y” > “回车”,确认保存并退出
4.1加载硬件直通相关模块 1 2 3 4 5 6 cat > /etc/modules <<EOF vfio vfio_iommu_type1 vfio_pci vfio_virqfd EOF
1 update -grub && update -initramfs -u -k all
5. 开启远程秘钥SSH登录
参数
作用
PermitRootLogin yes
是否允许root直接登入
PasswordAuthentication yes
启用密码认证
PubkeyAuthentication yes
启用公钥认证
AuthenticationMethods publickey,password
需要秘钥和密码同时认证通过
RSAAuthentication yes
启用RSA认证
5.1 开启root登入 1 2 3 sed - i 's/#PermitRootLogin prohibit-password/ PermitRootLogin yes/' / etc/ssh/ sshd_config \ && sed - i 's/#PasswordAuthentication yes/ PasswordAuthentication yes/' / etc/ssh/ sshd_config \&& service ssh restart
5.2 生成秘钥文件 1 ssh-keygen -b 384 -t ECDSA && cd /root/.ssh/ && cp id_ecdsa.pub authorized_keys && chmod 600 authorized_keys && chmod 700 ~/.ssh
5.3 保存秘钥文件到本地 使用WinSCP下载id_ecdsa 秘钥文件到本地保存
5.4 开启密码与秘钥双认证 1 2 3 4 sed - i 's/#PubkeyAuthentication yes/ PubkeyAuthentication yes/' / etc/ssh/ sshd_config \ && sed - i 's/#MaxAuthTries 6/ RSAAuthentication yes/' / etc/ssh/ sshd_config \&& sed - i 's/#MaxSessions 10/ AuthenticationMethods publickey,password/' / etc/ssh/ sshd_config \&& service ssh restart
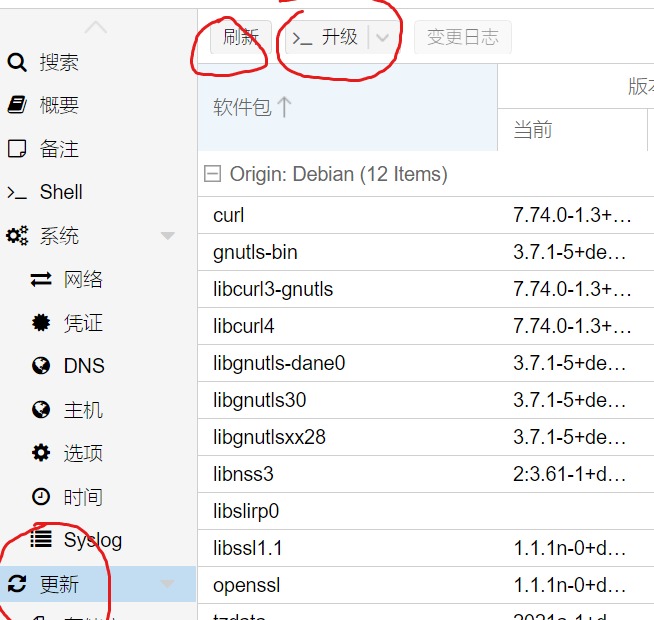
6. 更新系统
7. 温度显示 1 apt- get install lm- sensors && apt- get install nvme- cli && chmod + s /usr/ sbin/nvme && chmod +s / usr/sbin/ smartctl && systemctl restart pveproxy
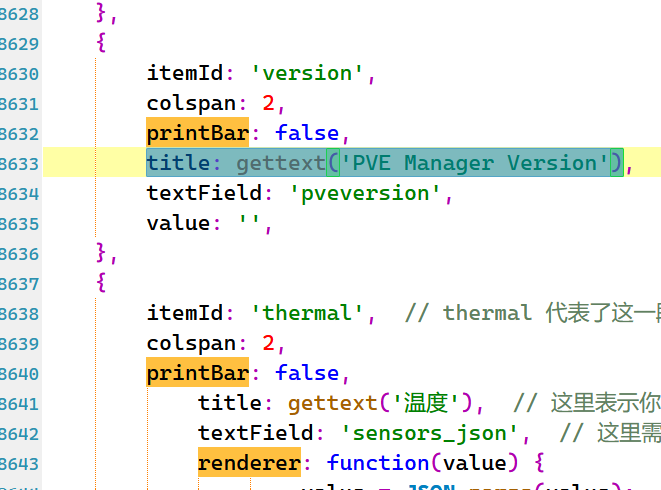
7.1编辑/usr/share/pve-manager/js/pvemanagerlib.js
搜索关键词 widget.pveNodeStatus
1 2 height : 380 ,bodyPadding : '15 5 15 5 ',
1 2 3 4 5 6 7 8 9 10 11 12 13 14 15 16 17 18 19 20 21 22 23 24 25 26 27 28 29 30 31 32 33 34 35 36 37 38 39 40 41 42 43 44 45 46 47 48 49 { itemId : 'thermal' , colspan : 2 , printBar : false , title : gettext ('温度' ), textField : 'sensors_json' , renderer : function (value ) { value = JSON .parse (value); const cpu0 = value['coretemp-isa-0000' ]['Package id 0' ]['temp1_input' ].toFixed (1 ); const pch = value['acpitz-acpi-0' ]['temp1' ]['temp1_input' ].toFixed (1 ); return `CPU: ${cpu0} °C || 主板: ${pch} °C` ; } }, { itemId : 'MHz' , colspan : 2 , printBar : false , title : gettext ('CPU频率' ), textField : 'cpusensors' , renderer :function (value ){ var f1 = value.match (/CPU min MHz.*?([\d]+)/ )[1 ]; var f2 = value.match (/CPU max MHz.*?([\d]+)/ )[1 ]; var f0 = value.match (/CPU.*scaling MHz.*?([\d]+)/ )[1 ]; var f0 = f0*f2/100 ; return `实时: ${f0} MHz || 最小: ${f1} MHz | 最大: ${f2} MHz ` } }, { itemId : 'nvme_ssd' , colspan : 2 , printBar : false , title : gettext ('NVME' ), textField : 'smartctl_nvme_json' , renderer : function (value ) { value = JSON .parse (value); if (value['model_name' ]) { try {var model_name = value['model_name' ];} catch (e) {var model_name = '' ;} try {var percentage_used = ' | 使用寿命: ' + value['nvme_smart_health_information_log' ]['percentage_used' ].toFixed (0 ) + '% ' ;} catch (e) {var percentage_used = '' ;} try {var data_units_read = value['nvme_smart_health_information_log' ]['data_units_read' ]*512 /1024 /1024 /1024 ;var data_units_read = '(读: ' + data_units_read.toFixed (2 ) + 'TB, ' ;} catch (e) {var data_units_read = '' ;} try {var data_units_written = value['nvme_smart_health_information_log' ]['data_units_written' ]*512 /1024 /1024 /1024 ;var data_units_written = '写: ' + data_units_written.toFixed (2 ) + 'TB)' ;} catch (e) {var data_units_written = '' ;} try {var power_on_time = ' | 通电: ' + value['power_on_time' ]['hours' ].toFixed (0 ) + '小时' ;} catch (e) {var power_on_time = '' ;} try {var temperature = ' | 温度: ' + value['temperature' ]['current' ].toFixed (1 ) + '°C' ;} catch (e) {var temperature = '' ;} return `${model_name} ${percentage_used} ${data_units_read} ${data_units_written} ${power_on_time} ${temperature} ` ; } else { return `提示: 未安装硬盘或已直通硬盘控制器` ; } } }, ],
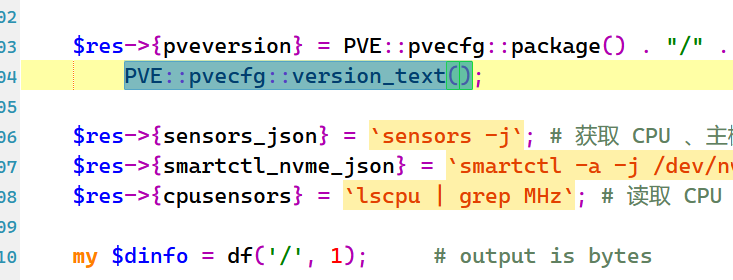
7.2编辑 /usr/share/perl5/PVE/API2/Nodes.pm
搜索关键词 PVE::pvecfg::version_text()
1 2 3 $res ->{sensors_json} = `sensors -j` ; $res ->{smartctl_nvme_json} = `smartctl -a -j /dev/nvme?` ; $res ->{cpusensors} = `lscpu | grep MHz` ;
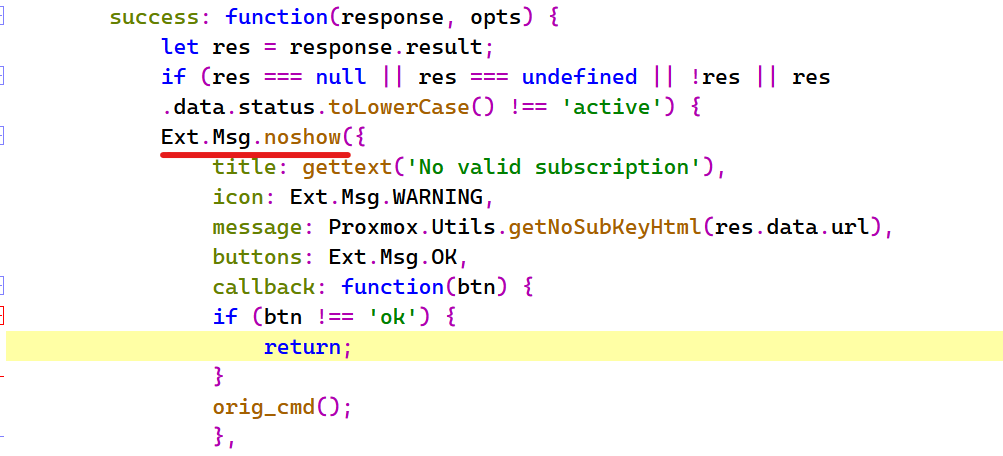
搜索关键词 Ext.Msg.show
重启网页服务
1 systemctl restart pveproxy
8. 自行制作补丁
1 2 3 4 5 6 proxmoxlib_js="/usr/share/javascript/proxmox-widget-toolkit/proxmoxlib.js" Nodes_pm="/usr/share/perl5/PVE/API2/Nodes.pm" pvemanagerlib_js="/usr/share/pve-manager/js/pvemanagerlib.js" cp ${proxmoxlib_js} ${proxmoxlib_js} bakcp ${Nodes_pm} ${Nodes_pm} bakcp ${pvemanagerlib_js} ${pvemanagerlib_js} bak
1 2 3 4 5 6 proxmoxlib_js="/usr/share/javascript/proxmox-widget-toolkit/proxmoxlib.js" Nodes_pm="/usr/share/perl5/PVE/API2/Nodes.pm" pvemanagerlib_js="/usr/share/pve-manager/js/pvemanagerlib.js" diff -uN ${proxmoxlib_js} bak ${proxmoxlib_js} > /tmp/ proxmoxlib_js.patch diff -uN ${Nodes_pm} bak ${Nodes_pm} > /tmp/ Nodes_pm.patch diff -uN ${pvemanagerlib_js} bak ${pvemanagerlib_js} > /tmp/ pvemanagerlib_js.patch
1 2 3 4 patch ${proxmoxlib_js} < /tmp/ proxmoxlib_js.patch patch ${Nodes_pm} < /tmp/ Nodes_pm.patch patch ${pvemanagerlib_js} < /tmp/ pvemanagerlib_js.patch systemctl restart pveproxy
9. 安装依赖 1 apt-get install iucode-tool
10. 安装英特尔微码intel-microcode
1
2
3
wget https://mirrors.tuna.tsinghua.edu.cn/debian/pool/non-free/i/intel-microcode/intel-microcode_3.20231114 .1 ~deb11u1_amd64.deb \ 20231114 .1 ~deb11u1_amd64.deb \ all
10.1 重启 10.2查看安装微码版本 1 dmesg - T | grep microcode
反馈信息中显示0xa6 即为目前新版microcode(以上为7505的反馈信息)
11. 错误直通网口解决办法
物理机ssh连接pve shell
查看虚拟机列表qm list
停止虚拟机qm stop 100
关闭虚拟机自动启动qm set 100 --autostart 0
重启rebbot